How to Choose the Best Photo for a Custom Pet Portrait
The best photo for a custom pet portrait is clear, well-lit, taken near your pet's eye level, and full of the expression you love most. It does not need to be a professional photograph. A simple phone photo can work beautifully when the eyes, face, fur color, and distinctive markings are easy to see.

The reference photo is the artist's main source of information. A better photo helps the finished portrait feel more recognizable, personal, and true to your pet. Use this guide to choose the strongest image before ordering.
Quick checklist: is your pet photo suitable?
A strong reference photo usually meets most of these conditions:
- The eyes and facial features are in focus.
- Natural light shows the true coat color.
- The photo is taken near the pet's eye level.
- The ears, face, and important markings are visible.
- The image has not been heavily filtered or compressed.
- The expression feels like your pet.
Do not worry if one condition is missing. Additional photos can often provide the details that are unclear in your favorite image.
1. Choose a photo with clear eyes and facial details
People recognize a pet through small details: the shape of the eyes, the direction of the ears, the pattern around the nose, and the way the mouth rests. These details should be reasonably sharp when you zoom in.
Motion blur can make fur texture and eye shape difficult to interpret. If your favorite photo is slightly blurry, include one or two sharper photos of the same pet so the artist can understand the missing details.
What should be visible?
- both eyes, unless the chosen pose intentionally shows a side profile;
- the nose and mouth;
- the full shape of the ears;
- distinctive patches, stripes, spots, or whisker markings;
- the natural direction and texture of the fur.
2. Natural daylight is usually best
Soft daylight makes coat color easier to judge and preserves detail in both light and dark fur. Try taking the photo near a window or outdoors in open shade. Bright midday sun can create harsh shadows, while a dark room can make the image grainy.
Avoid strong colored lighting. Warm indoor bulbs may turn white fur yellow, while blue or purple decorative lights can change the appearance of the entire coat.
Tips for light-colored pets
White and cream fur can lose detail when the photo is overexposed. Choose an image where individual strands and shadows are still visible around the cheeks, chest, and ears.
Tips for dark-colored pets
Black and dark brown fur needs enough light to reveal the eyes, nose, and changes in texture. A photo near a bright window often works better than one taken with direct flash.
3. Photograph your pet near eye level
Photos taken from directly above can make the head look larger and the body look unusually small. For a more natural portrait, lower the camera until it is close to your pet's eye level.
A straight-on view is helpful for a balanced portrait, while a gentle three-quarter angle can show the shape of the muzzle and add personality. Side profiles can also work well when that pose is especially characteristic of your pet.
4. Pick personality over perfect posing
The most technically perfect photo is not always the most meaningful one. A familiar head tilt, curious stare, relaxed smile, or slightly raised ear may capture your pet better than a formal pose.
When deciding between several clear images, ask yourself: Which photo would a close friend immediately recognize as my pet? That is often the best choice.
5. Use the original, highest-resolution image
Whenever possible, upload the original file from your phone or camera. Screenshots, social-media downloads, and images sent repeatedly through messaging apps may lose fine detail through compression.
Do not crop too tightly before uploading. Leaving some space around the ears, head, and chest gives the artist more flexibility when planning the composition.
6. A simple background helps, but it is not required
A clean background makes the pet easier to see, but the original setting usually does not need to appear in the finished artwork. A sofa, garden, blanket, or ordinary room is acceptable as long as the pet is not hidden by objects or deep shadow.
Avoid photos where a fence, hand, toy, or another animal covers an important part of the face. If the obstruction is small, send an additional image showing what is hidden.
Which photo should you choose for each portrait style?
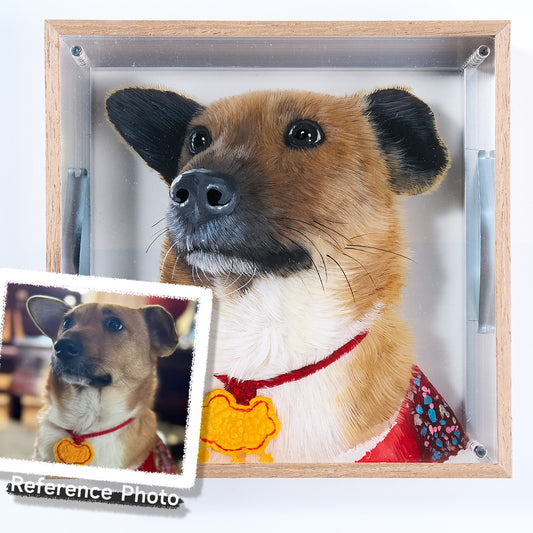
For a 3D layered pet portrait
A custom 3D layered pet portrait benefits from a clear view of the face and fur because the artwork separates visual details across multiple transparent acrylic layers. Images with visible eyes, muzzle shape, ear outline, and fur direction give the artist more information for creating depth.
Front-facing and three-quarter portraits are especially effective. They allow facial features and foreground fur to be distributed across layers, creating a stronger dimensional effect from different viewing angles.
For a hand-painted glass pet portrait
A hand-painted glass pet portrait works well with expressive close-ups and clean silhouettes. Because light passes through the transparent surface, clear color boundaries and recognizable facial details are particularly valuable.
Choose a photo that shows the expression you want to see every day. A playful open mouth, calm gaze, or elegant profile can each create a very different feeling.
Can you combine details from multiple photos?
Multiple reference photos are helpful, but they should support one main image rather than describe several conflicting poses. Choose one primary photo for the composition, then add other images to clarify:
- the true eye color;
- coat markings hidden by shadow;
- the shape of an ear or tail;
- fur color under natural light;
- a collar or accessory you want included.
If you want the pose from one photo and the expression from another, explain this clearly before the artwork begins. Some combinations are possible, but a consistent angle and lighting will produce a more natural result.
How to choose photos for two or more pets
You do not always need a perfect group photo. Separate photographs can be used as references when each pet is clearly visible, but the images should be reasonably compatible.
For a balanced multi-pet portrait:
- choose photos taken from similar camera heights;
- avoid combining an extreme close-up with a distant full-body image;
- provide information about each pet's relative size;
- identify which pet should appear on the left, right, front, or center;
- send clear images of markings that distinguish similar-looking pets.
What if the pet has passed away and the photos are old?
Use the most meaningful photo as the main reference, even if it is not perfect. Then collect every additional image that can clarify the pet's appearance. Old phone photos, printed photographs, and screenshots may still contain useful information when viewed together.
If you only have a printed photo, place it on a flat surface near a window and photograph it straight from above. Avoid reflections, camera flash, and angled shots. A high-quality scan is even better when available.
Tell the artist which details matter most. For a memorial portrait, a familiar expression or distinctive marking may be more important than recreating every part of the original background.
Photos to avoid when a better option is available
| Photo issue | Why it is difficult | Better option |
|---|---|---|
| Heavy blur | Eye shape and fur direction are unclear | Add a sharper detail photo |
| Strong filter | Coat and eye colors may be inaccurate | Send the unfiltered original |
| Direct flash | Eyes reflect and fur becomes flat | Use soft daylight near a window |
| Very dark image | Facial details disappear into shadow | Add a brighter reference image |
| Tight crop | Ears or head shape may be missing | Upload the uncropped file |
| Face partly covered | Important features must be guessed | Provide another view of the hidden area |
Before uploading: a final five-step check
- Choose one main photo that defines the pose and expression.
- Zoom in and confirm that the eyes, nose, and markings are visible.
- Find the original file instead of a screenshot or social-media copy.
- Add one to three supporting photos when color or details are unclear.
- Write a short note explaining the features that matter most to you.
Frequently asked questions
Does the photo need to be professionally taken?
No. A clear phone photo in natural light is usually more useful than a professional image that is heavily edited, taken from too far away, or missing your pet's familiar expression.
Can I use a screenshot?
You can when it is the only available image, but the original photo is better because it contains more detail. If the screenshot is from a video, also send other photos that show the pet's colors and facial features clearly.
Can the background be removed?
Yes, the background in the reference photo does not usually need to appear in the portrait. The important requirement is that the pet is clearly separated from surrounding objects.
Can a collar, bow, or favorite accessory be included?
Yes. Make sure the accessory is visible in the main photo or provide a separate clear reference image. Mention whether it should be copied exactly or simplified.
What if I am unsure which photo is best?
Choose your favorite two or three images and explain which expression you prefer. The clearest photo can provide technical detail while the favorite image guides the personality and mood.
Can separate photos be used for multiple pets?
Yes, especially when a good group photo does not exist. Photos taken from similar angles and distances are easier to combine naturally. Include notes about relative size and preferred arrangement.
The best photo is the one that feels like your pet
Sharpness and lighting matter, but recognition matters more. Choose an image that brings back the expression, posture, or small detail you never want to forget. Then support it with clearer reference photos when needed.
Once you have selected your images, you can turn them into a hand-painted 3D layered portrait or a custom glass pet portrait. A thoughtful reference set gives the artist the best chance to create a keepsake that truly feels like your companion.